Rustic Furniture Refinishing Techniques: Unlocking the Beauty of Old Wood
Assessing the Current Finish
Before you begin refinishing your rustic furniture, it's essential to assess the current finish. Check for any signs of wear and tear, such as cracks, scratches, or water damage. This will help you determine the best course of action for restoration. If the finish is damaged beyond repair, it may be necessary to strip the old finish and start from scratch.
Stripping the Old Finish
Sanding and Smoothing
After stripping the old finish, it's time to sand and smooth the surface. Use progressively finer grits of sandpaper to achieve a smooth finish. This is an essential step in preparing the wood for staining or painting.
Staining and Sealing
Distressing for a Rustic Look
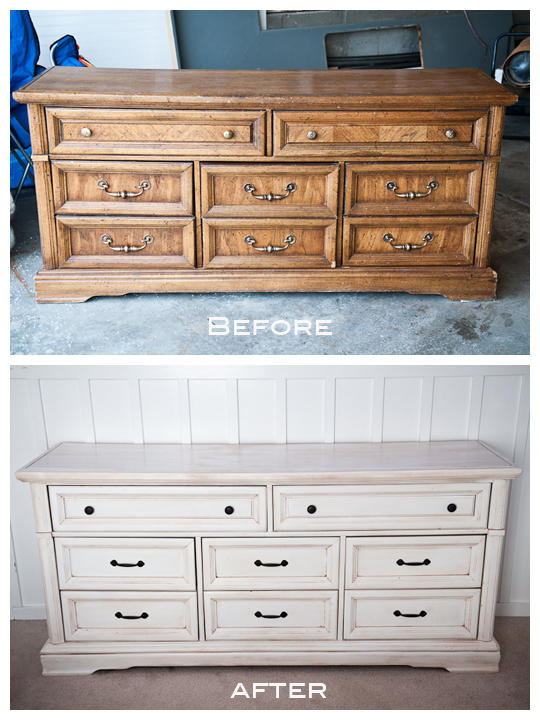
As we can see from the illustration, Rustic Furniture Refinishing Techniques has many fascinating aspects to explore.
If you're looking to create a rustic, aged look, you can distress the wood by sanding it down to reveal the natural grain. Use a high-grit sandpaper to smooth out the surface, and then use a lower-grit sandpaper to create a distressed look. You can also use a wire brush to create a more textured finish.
- High-grit sandpaper
- Chemical stripper (if necessary)
- Stain
- Sealant
- Wire brush (optional)
- Paintbrush or foam brush
- Drop cloths or tarps
Step-by-Step Guide
Step 1: Clean and Degrease
Begin by cleaning and degreasing the surface of the wood. Use a high-grit sandpaper to smooth out the surface, and then use a tack cloth to remove any dust or debris.
Step 2: Strip the Old Finish (if necessary)
Use a chemical stripper to remove the old finish, following the manufacturer's instructions. Be sure to choose a stripper that is safe for the type of wood you're working with.

Such details provide a deeper understanding and appreciation for Rustic Furniture Refinishing Techniques.
Step 3: Sand and Smooth
Use progressively finer grits of sandpaper to achieve a smooth finish. This is an essential step in preparing the wood for staining or painting.
Step 4: Stain and Seal
Apply the stain according to the manufacturer's instructions, and then seal the wood with a clear sealant.
Step 5: Distress for a Rustic Look (optional)
Use a high-grit sandpaper to smooth out the surface, and then use a lower-grit sandpaper to create a distressed look. You can also use a wire brush to create a more textured finish.
Conclusion

Furthermore, visual representations like the one above help us fully grasp the concept of Rustic Furniture Refinishing Techniques.
Refinishing rustic furniture is a rewarding process that requires patience and attention to detail. By following these techniques and using the right tools and materials, you can restore your old furniture to its former glory, adding character and charm to your home. Whether you're a seasoned pro or a beginner, these steps will guide you through the process of refinishing rustic furniture, ensuring a durable and long-lasting finish.
Additional Tips and Resources
For more information on refinishing rustic furniture, check out the following resources:
- Home Restoration & DIY Learning Center
- Browse through the largest collection of home design ideas for every room in your home
- Discover essential tips for stripping and preparing wood furniture with expert restoration techniques
- Learn how to refinish wood furniture with this step-by-step guide, including a photo collection of before-and-after inspiration!
Share Your Projects and Tips!
We'd love to hear about your refinishing projects and tips! Share your stories and photos with us, and we'll feature them on our social media channels. Happy refinishing!


 | Family Handyman")


")

")


")